Installing a fence can be a rewarding DIY project, offering both functionality and aesthetic appeal to your property. Whether you’re aiming to enhance privacy, improve security, or simply add curb appeal, understanding the process and associated costs is critical. This guide outlines the essential steps, material costs, and expert insights for successfully installing your own fence in 2025.
Key Considerations Before Starting
- Purpose of the Fence: Determine whether the primary goal is privacy, security, or decorative enhancement.
- Local Regulations: Research local zoning laws and HOA guidelines that may dictate height restrictions or material usage.
- Budget: Establish a clear budget for materials and tools.
- Time Commitment: Assess how much time you can dedicate to the installation process.
Cost Breakdown of Materials in 2025
| Material | Average Cost Per Linear Foot (USD) | Durability Rating | Maintenance Needs |
| Wood (Cedar/Pine) | $12–$25 | Medium | Regular staining/painting |
| Vinyl | $20–$40 | High | Minimal maintenance |
| Chain Link | $8–$18 | Medium | Occasional cleaning |
| Aluminum | $25–$50 | High | Low maintenance |
| Wrought Iron | $30–$60 | Very High | Rust prevention required |
These prices may vary slightly depending on local suppliers and fluctuations in material availability.
Tools You’ll Need
- Measuring tape
- Level
- Post hole digger or auger
- Hammer or nail gun
- Circular saw (if working with wood)
- Power drill and screws
- Quick-set concrete
Renting larger equipment (e.g., an auger) from local hardware stores can help save money if you don’t own one.
Expert Tips for Success
- Plan Your Layout Carefully: Use stakes and string lines to outline your fence’s exact placement before digging any holes. Confirm boundary lines with neighbors if necessary.
- Invest in Quality Materials: While cheaper options may seem appealing initially, investing in durable materials like vinyl or aluminum reduces long-term repair costs.
- Double Check Measurements: Accurate post spacing ensures structural integrity—measure twice to avoid costly mistakes.
- Work with a Partner: Installing fences is more manageable with two people—especially when aligning posts or handling large panels.
Environmental Considerations
When selecting materials, consider eco-friendly options such as sustainably sourced wood or recycled composite fencing. Additionally, aim to minimize waste by measuring accurately and reusing leftover materials whenever possible.
By carefully planning your DIY fence project and following these steps, you’ll create a sturdy structure that enhances your property while staying within budget constraints for 2025 projects.
Building a Strong Fence Foundation: Tips from a Fencing Contractor Gainesville FL
When it comes to building a fence that stands the test of time, one of the most critical factors to consider is post depth. Properly setting your fence posts ensures structural integrity, prevents sagging, and helps your fence withstand environmental stresses like high winds or shifting soil. The one-third rule is a widely recognized guideline that can simplify this process and provide you with a strong foundation.
What Is the One-Third Rule?
The one-third rule states that at least one-third of the total post length should be buried in the ground. This standard applies regardless of whether you are installing wooden, vinyl, or metal fence posts. By following this guideline, you create stability by anchoring enough of the post below ground to counterbalance above-ground forces.
For example: – 8-foot post: At least 2 feet should be buried. – 6-foot post: At least 2 feet should be buried. – 10-foot post: A minimum of 3 feet should be in the ground.
This rule not only strengthens your fence but also minimizes future issues such as leaning or complete failure during adverse weather conditions.
Factors That Influence Post Depth
- Sandy soils may require deeper post holes for added stability.
- Clay-heavy soils hold posts more securely but can shift during freeze-thaw cycles.
- In regions with frost, digging below the frost line (usually 3-4 feet) is vital to prevent frost heave from displacing your posts.
- Taller fences act like sails in high wind and demand deeper posts for additional support.
- Heavier materials such as wrought iron may need extra anchoring compared to lightweight options like vinyl.
- Privacy fences require sturdier foundations compared to decorative or garden borders due to their height and weight.
Tools and Materials Needed for Proper Post Depth
| Tool/Material | Purpose |
| Post Hole Digger | Manual tool for digging precise holes |
| Auger | Speeds up hole digging (manual or powered) |
| Gravel | Provides drainage at post base |
| Concrete Mix | Stabilizes posts in place |
| Measuring Tape | Ensures consistent depth |
| Level | Helps confirm straight installation |
Benefits of Correct Post Depth
Setting proper post depth provides several long-term benefits: – Enhanced Durability: A properly installed fence resists shifting, leaning, or falling over time. – Increased Safety: Prevents accidents caused by unstable fencing sections. – Improved Appearance: Straight lines and balanced spacing contribute to an aesthetically pleasing result.
By investing time into understanding and adhering to appropriate post depth guidelines—including using the one-third rule—you can save yourself from costly repairs down the line while creating a secure boundary that meets both practical and aesthetic needs.
Building a Strong Foundation for Fence Installation Gainesville FL: Post Depth and the One-Third Rule
When it comes to constructing a durable and long-lasting fence, one of the most critical factors is how deep your fence posts are set. Proper post depth ensures stability, prevents leaning, and protects your fence from environmental stresses such as wind, moisture, and soil movement. The “One-Third Rule” serves as an essential guideline for determining accurate post depth, ensuring a robust foundation for your fencing project.
Understanding the One-Third Rule
The One-Third Rule is a standard practice in fence construction that recommends burying one-third of the total post length into the ground. This ensures that your posts have sufficient anchoring to withstand external forces over time.
For example: – If you are using 9-foot-long fence posts, at least 3 feet (one-third) should be buried underground. – For 6-foot-tall fences (above ground), use an 8-foot-long post with 2 feet buried below ground level.
This rule provides balance between adequate support underground while leaving enough height for a functional and visually pleasing fence above ground.
Factors Influencing Post Depth
- Fence Height
Taller fences require deeper post holes to handle increased wind resistance. Always plan for greater depth when constructing privacy or security fences. - Sandy Soil: Requires deeper post insertion for stability since sandy soil shifts more easily.
- Clay Soil: Offers more natural grip but can expand with moisture; ensure proper drainage around posts.
- Rocky Soil: May require specialized tools to dig deeper or alternative solutions like concrete footings.
- Local Climate
In areas prone to frost heave (freezing and thawing cycles), posts must be set below the frost line—the depth at which soil freezes during winter. This prevents shifting or loosening of the posts due to frost action. - Load-Bearing Requirements
If the fence needs to support additional loads such as gates or heavy decorations, deeper and reinforced foundations may be necessary.
Tools and Materials Needed
| Tool/Material | Purpose |
| Post hole digger | To excavate uniform holes |
| Gravel | Creates a drainage layer at the bottom of each hole |
| Quick-set concrete mix | Secures posts in place with added stability |
| Level | Ensures vertical alignment |
| Measuring tape | Assists in accurate spacing and depth measurement |
Step-by-Step Guide to Achieving Proper Post Depth
- Measure Your Posts:
Calculate how much length needs to remain above ground based on your desired fence height and apply the One-Third Rule for underground depth. - Mark Your Digging Line:
Use stakes or spray paint to indicate where each hole should be dug along your property line. - Dig Holes Appropriately:
Use a post hole digger or auger to reach the desired depth (one-third of total post height). Ensure each hole is about three times wider than the diameter of your post for added stability when backfilled. - Add Gravel Base:
Pour approximately 6 inches of gravel into each hole before placing the post. This improves drainage and helps prevent water pooling around wooden posts, reducing rot risks over time. - Set Posts in Concrete:
Mix quick-set concrete according to manufacturer instructions and pour it into each hole around the base of the post until half full. Check vertical alignment with a level before filling completely. - Allow Curing Time:
Let concrete cure fully (typically 24–48 hours) before attaching horizontal rails or panels.
Tips for Success
- Always check local building codes as they may dictate minimum depths based on regional conditions.
- For wooden posts, treat them with water-resistant sealant before installation to extend their lifespan.
- When working in areas with frequent flooding, consider additional reinforcement like metal sleeves around wooden posts.

Step-by-Step Guide to Fence Repair Gainesville FL for a Perfectly Restored Fence
Building a fence can be a rewarding DIY project. It enhances the privacy, security, and aesthetic appeal of your property. However, successfully installing a fence requires planning, precision, and the right tools. This step-by-step guide will walk you through the process to ensure your fence is sturdy, durable, and visually appealing.
Step 1: Planning and Preparation
Before beginning the installation process, careful planning is crucial. Here’s how to start:
– Determine Property Lines: Confirm your property boundaries to avoid disputes with neighbors. Consider hiring a surveyor if necessary. – Check Local Regulations: Research local zoning laws or homeowners’ association (HOA) rules regarding fence height, materials, and placement.
– Call Before You Dig: Contact utility companies to mark underground cables or pipes to prevent accidental damage during digging. – Choose Materials: Select fencing materials based on your needs—wood for traditional appeal, vinyl for low maintenance, or metal for durability.
Step 2: Gather Tools and Materials
Having the right tools ensures smooth progress during installation. Essential items include: – Measuring tape – Level – Post hole digger or auger – Shovel – Hammer or nail gun – Circular saw
Additionally, procure materials such as fence posts, panels or pickets, concrete mix (if needed), nails/screws, and gravel.
Step 3: Mark Fence Layout
- Use stakes and string to outline your desired fence line.
- Place stakes at each corner and every planned post location.
- Measure spacing between posts consistently (typically 6–8 feet apart).
Step 4: Dig Post Holes
To ensure stability: 1. Follow the One-Third Rule, digging post holes one-third the length of each post. 2. The diameter should be three times the width of the post. 3. Add gravel at the bottom of each hole for drainage before setting posts.
| Fence Height | Recommended Post Depth |
| 4 feet | 2 feet |
| 6 feet | 3 feet |
| 8 feet | 4 feet |
Step 5: Install Posts
- Place posts in holes and use a level to ensure alignment vertically.
- Pour concrete around each post base; allow it to cure following manufacturer instructions (24–48 hours typically). For wooden fences in dry climates, tamping soil may suffice instead of concrete.
Step 6: Attach Fence Panels or Rails
- Secure horizontal rails between posts if using pickets; ensure they are evenly spaced along post height.
- Position them between two posts.
- Nail or screw them securely into place.
Step 7: Install Pickets (if applicable)
For custom fences with pickets: 1. Attach pickets vertically along rails with equal spacing for ventilation and aesthetics. 2. Use a spacer block to maintain consistent gaps between pickets.
Step 8: Add Finishing Touches
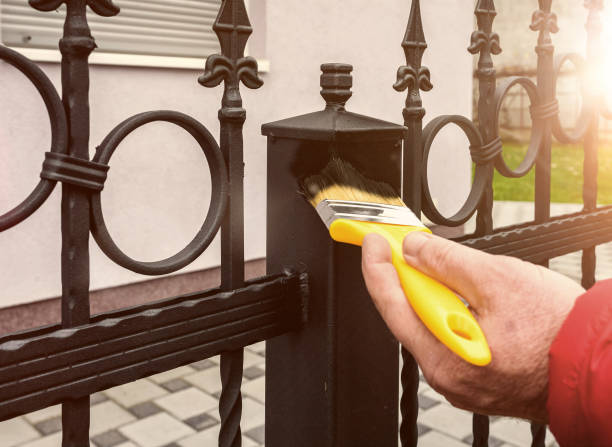
To extend the life of your new fence: – Apply stain or sealant for weatherproofing wooden fences. – Check all fasteners for tightness. – Clean up debris from installation.
By following these steps methodically while adhering to best practices like proper post spacing and depth guidelines, you’ll achieve a well-built fence that stands strong over time while adding value to your property.
Common Mistakes to Avoid When Installing Your Fence and How to Prevent Them
Building a fence can seem like a straightforward project, but even minor errors during the installation process can lead to long-term issues, such as structural instability or faster wear and tear. To ensure your fence stands the test of time and looks professional, it’s essential to be aware of common pitfalls and learn how to avoid them. Below are some of the most frequent mistakes made during fence installation, along with tips for preventing them.
1. Skipping the Property Line Survey
Failing to confirm property boundaries is one of the most common errors homeowners make when installing a fence. This mistake can lead to disputes with neighbors or even legal issues.
- Review your property survey documents or obtain them from your local municipality if needed.
- Use boundary markers or hire a professional surveyor to confirm property lines before beginning installation.
- Communicate with neighbors if your fence will be near shared boundaries.
2. Using Inappropriate Materials
Choosing materials that are not durable enough for the environment where you live can result in early deterioration of your fence. For example, untreated wood may rot in regions with high humidity.
- Select materials suited for your climate (e.g., pressure-treated wood, vinyl for wet climates, or metal for durability).
- Consider long-term maintenance requirements when choosing materials.
- Invest in weather-resistant coatings or sealants if you opt for natural wood.
| Material Type | Best For | Potential Issues |
| Wood | Aesthetic flexibility | Susceptible to rot and pests |
| Vinyl | Low-maintenance areas | Can crack in extreme cold |
| Metal (Aluminum) | Durability-focused designs | May corrode without treatment |
3. Incorrect Post Depth
Posts that are not installed deep enough are prone to shifting over time due to wind pressure, soil movement, or frost heave.
- Follow the “one-third rule”: ensure at least one-third of the post’s length is buried underground.
- Dig post holes below the frost line in colder climates (typically around 30–36 inches).
- Use concrete footings around posts for added stability.
4. Neglecting Drainage Considerations
Installing a fence without proper attention to drainage can cause water pooling around posts, leading to rot or rust over time.
- Grade the ground so water drains away from posts.
- Add gravel at the base of each posthole before pouring concrete for improved drainage.
5. Failing To Plan Gate Placement
Improper gate placement can lead to functional inconveniences and long-term wear on certain sections of the fence due to uneven weight distribution.
- Place gates in areas with level ground whenever possible.
- Reinforce gateposts by using wider posts securely anchored with concrete.
Summary Checklist
To avoid these common mistakes: – Confirm property lines before starting construction. – Choose durable materials appropriate for your environment. – Set posts at sufficient depth and use proper footings like gravel and concrete. – Ensure proper drainage around all posts. – Thoughtfully plan gate locations and reinforce supporting structures.
By addressing these potential missteps proactively, you’ll save time, money, and effort while ensuring your new fence provides both utility and aesthetic appeal for years ahead.
When to Hire a Professional for Your Fence Installation Project
Installing a fence can be a rewarding DIY project for many homeowners, but there are instances where hiring a professional is the best decision. Before undertaking the task yourself, it’s important to assess whether professional assistance might save you time, money, or frustration. Below are some scenarios in which hiring a professional is recommended.
1. Complex Terrain or Uneven Land
If your property has uneven ground, slopes, or rocky soil, installing a fence can become significantly more challenging. A professional team has the expertise and equipment to handle such conditions effectively. They can contour the fence to match your landscape and ensure proper alignment and stability.
2. Specialized Fencing Materials
Certain fencing materials like wrought iron, aluminum, or vinyl require specialized tools and skills for cutting, welding, or fastening. Additionally, high-end wood types may demand precision craftsmanship to avoid damage during installation. Professionals are equipped with both the tools and experience necessary to work with these materials efficiently.
3. Local Building Codes and Permits
Every region has its own set of building codes and zoning regulations regarding fences—such as height restrictions or setback requirements from property boundaries. Failing to comply with these regulations may result in fines or having to dismantle your newly installed fence. Professionals are familiar with local codes and can ensure your project adheres to them without complications.
4. Large-Scale Projects
For extensive fencing projects that cover large areas of land, hiring professionals is often more practical. Managing post digging, securing materials properly over large spans, and ensuring uniformity requires manpower and experience that most DIYers may not have access to.
| Fence Type | Ease of DIY Installation | Professional Recommended For |
| Chain-link Fence | Moderate | Large areas; uneven terrain |
| Vinyl Fence | Difficult | Precision work; high visibility areas |
| Wood Privacy Fence | Moderate | Custom designs; sloped properties |
| Wrought Iron Fence | Difficult | Complex designs; welding needed |
5. Time Constraints
Fence installation can be labor-intensive and time-consuming if done alone or without prior experience. A professional team will not only complete the job faster but also handle unexpected challenges efficiently without compromising on quality.
6. Structural Integrity Concerns
Properly setting posts is critical for ensuring the structural stability of your fence over time. Factors like frost heave in colder climates or shifting soil in certain regions may require advanced solutions such as deeper post holes or reinforced footings—tasks best left to skilled professionals.
Benefits of Hiring Professionals
- Warranty Protection: Many fencing contractors offer warranties on their work.
- Access To High-Quality Materials: Contractors often source superior materials at discounted rates compared to retail pricing.
- Enhanced Aesthetics: Properly installed fences by experts tend to look more polished.
- Reduced Risk of Errors: Professionals help minimize costly mistakes during installation.
When deciding whether to hire a professional for your fence installation project, carefully weigh factors like complexity, time availability, budget considerations, and personal skill level against the potential benefits offered by expert services.
- Choosing the Right Fencing Contractor Gainesville FL for Quality and Long-Term Benefits
- How to Choose the Right Fencing Contractor Gainesville FL for Your Specific Needs
- The Ultimate Guide to Fence Installation Gainesville FL: Choosing and Installing Chain Link Fencing
- Discover Why Homeowners Trust the Leading Fence Company Gainesville FL for Vinyl Fencing Solutions
- Expert Tips and Material Costs for DIY Fence Installation from a Trusted Fence Company Gainesville FL
- Fence Installation Gainesville FL: Traditional Wood Fence Options That Stand the Test of Time
- What to Expect When Hiring a Fencing Contractor Gainesville FL for Your Installation